Countertops are a big aspect of making your kitchen match your style and desired utility. Your counters alone can completely change the way your kitchen looks, feels, and functions. Over the years, design and technology have evolved to create high-quality countertop options for various budgets, styles, durability needs, and household lifestyles. With old trends returning and new trends beginning, there are always excellent materials and designs to choose from that are worth the investment!
Upfront Costs: $-$$
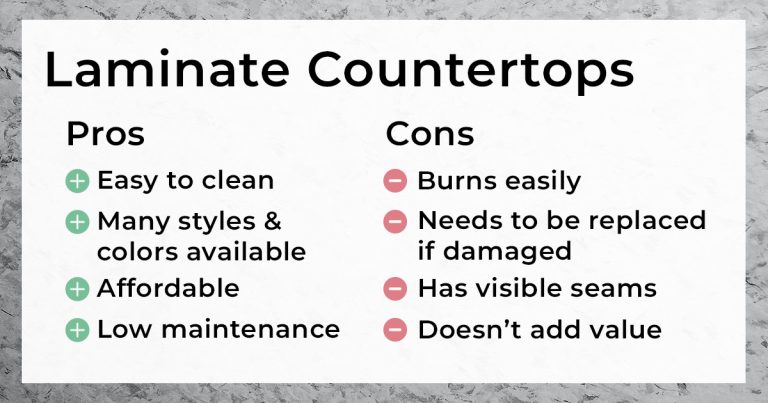
Laminate countertops are known for being more affordable than other countertop materials. While these countertops can be difficult to repair, they’re durable and function well in high-traffic kitchens. With little maintenance required, including being easy to clean, laminate countertops are adaptable and hold up against kids, frequent baking, and daily cooking.

These counters are nonporous so you don’t have to worry about resealing them as they don’t absorb water or harbor bacteria, mold, and stains. However, laminate countertops are easily damaged by heat so you should never place a hot pan on them. Once damage has been done to laminate counters, they’re near impossible to repair.
If increasing your home value is a priority when renovating your kitchen, you’ll want to avoid laminate countertops. Because this material is more budget-friendly it doesn’t add much to your home’s value and has visible seams. However, don’t let that stop you from considering laminate counters as they still have a lot to offer!
These countertops are great for people who want a particular style or color as there are many options to choose from. Today, these countertops come in many different patterns, colors, and designs. From natural stone to rustic wood, laminate countertops have evolved to look more aesthetically pleasing and unique for a fraction of the price. Best of all, laminate counters are easy to clean and don’t need routine maintenance. If your top countertop priorities are affordability, different options, and little to no maintenance, laminate countertops are a great choice.
Upfront Costs: $-$$
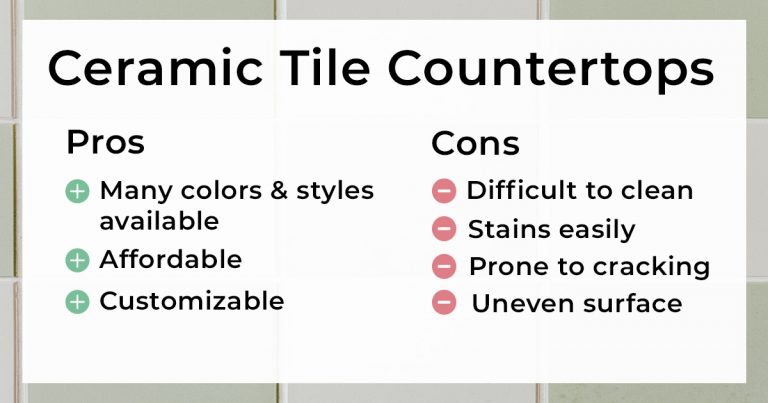
Ceramic tile countertops have been around for decades and can give kitchens their own vibrant, distinct, and personalized looks. While ceramic tile is one of the cheaper countertop materials, some tiles are more expensive than others. This countertop material has countless options for colors, patterns, and designs that fit any budget.
Unfortunately, tile countertops can be difficult and time-consuming to clean. The grout on tile counters stains very easily and needs to be cleaned often to reduce this. However, one solution to avoid stained grout is to choose a grout that is darker in color. With darker grout, stains won’t be as noticeable.

Another downside to ceramic tile counters is their uneven surfaces. Because these counters have grooves and dips, baking and cooking on tile countertops can be frustrating. Furthermore, ceramic tile countertops are less durable than other materials and can easily crack. That being said, ceramic tiles give you the ability to completely personalize your kitchen space with tiles in all colors and styles.
If you love the look of ceramic tiles in your kitchen but don’t want the frequent cleaning and upkeep that comes with these counters, consider using ceramic tile as your backsplash. With a ceramic tile backsplash, you can still achieve that look minus the extra work.
Upfront Costs: $-$$
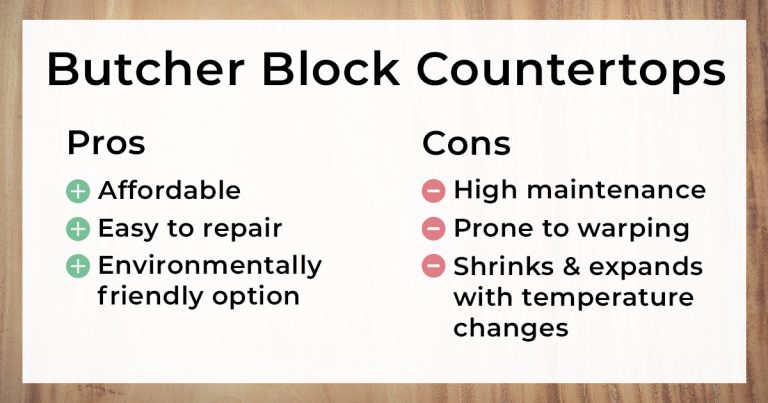
Butcher block countertops are a great choice for homeowners going for a rustic but contemporary look. These counters are created by gluing small planks of wood together so each countertop is unique. Butcher block countertops are generally more affordable than stone countertops, but it really depends on the countertops’ type of wood, wood grain, thickness, and design. Some popular wood species used for these counters include teak, maple, ash, cherry, oak, acacia, birch, and bamboo.
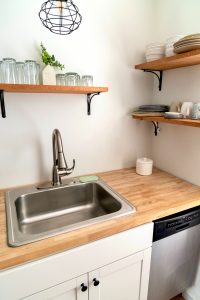
If you like butcher block countertops but want to lower your carbon footprint, bamboo is the most environmentally friendly option. In addition to being better for the environment, bamboo is one of the more affordable wood species. Although it may be tempting, these countertops shouldn’t be used as a cutting board. Cutting food directly on your butcher block counters can change the evenness and feel of the countertop’s surface.
Homeowners interested in butcher block countertops should be aware this material takes a lot of work and needs to be resealed every 6 months or twice a year to reduce the risk of staining and warping. The first year you have your butcher block counters, you need to follow an extensive sealing process to ensure your butcher block is fully protected. This sealing schedule starts with applying a coat once a day for a week. After the first week, you’ll apply a coat once a week for the timespan of a month. Once the first month ends, you’ll move on to applying a coat once a month for a year.
Resealing your butcher block countertops is important to keep the wood from holding bacteria, trapping moisture, cracking, and warping. Additionally, because they’re made from wood, butcher block counters may shrink and expand during seasonal temperature changes. That being said, these counters can be easily repaired with some light sanding to remove stains and shallow scratches. All you need to keep your butcher block countertops clean is some mild soap and water or vinegar.
Upfront Costs: $$-$$$
Quartz countertops are a mix of resin and natural quartz. These counters have an appearance that’s shiny, glossy, and similar to marble countertops while costing much less. They are very durable and good for kitchens that get heavy use as they’re resistant to stains, scratches, chips, dents, and cracks. However, these counters are susceptible to heat damage so trivets are always needed when handling hot pots and pans.

Quartz counters have a lower maintenance level than many other types of countertops. While other counters need routine resealing to make sure they stay resistant to moisture, bacteria, and staining, these countertops never need to be resealed because they’re nonporous and won’t absorb moisture. You can choose to reseal your counters for extra protection, but this isn’t necessary.
These heavy-duty and low-maintenance countertops are great additions to many kitchens and household lifestyles. For homeowners who want the style of stone countertops with a lower price tag and less upkeep, quartz countertops have some excellent options

Upfront Costs: $$-$$$
Granite countertops are uniquely patterned and very durable. Because they’re beautiful and able to withstand plenty of use, granite counters are one of the most popular types of counters. Despite their popularity, these countertops cannot be done as a DIY project. Granite counters are very heavy and will need to be installed by a professional to avoid damaging your cabinets below.

Countertops made from granite need to be resealed once every 1 to 5 years to ensure protection against bacteria and prevent moisture absorption. Even though they need to be resealed every few years, granite counters are still lower maintenance than many other natural stone countertops. Granite is stain-resistant and easy to clean so it doesn’t require any special cleaning supplies, just some mild soap and water.
One easy way to see if your granite countertops need to be resealed is to pour a bit of water on your counters and let the water sit for 10 to 15 minutes. Once the time is up, wipe away the water on the counter and check for a dark spot. You don’t want your counter absorbing the water so if the counter has a dark spot where the water was sitting, it needs to be resealed.
One feature of granite countertops that attracts many homeowners is the ability to add original, unrepeatable counters to their kitchens. No homes with granite countertops are going to have the same granite pattern. Additionally, even though granite countertops are made from natural stone, there are multiple colors homeowners can choose from. If you’re looking for a countertop that is lasting, hardwearing, easy to clean, and comes in different styles, granite countertops may be for you.

Upfront Costs: $$$+
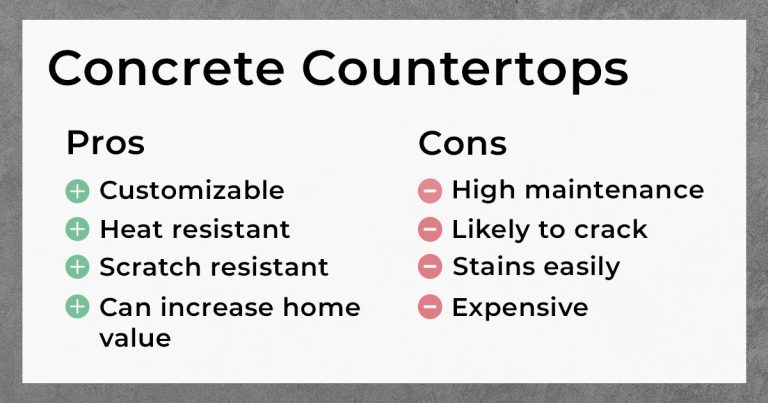
Concrete countertops are great for homeowners wanting a farmhouse or industrial-style kitchen. That being said, these countertops cost more money and need more upkeep than other countertop materials. Concrete counters are generally custom-made and need to be done by professionals as they’re heavy and, if improperly installed, can damage the cabinets below.
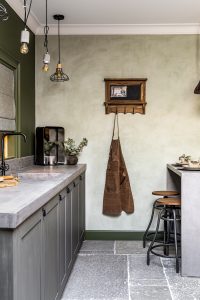
These countertops are scratch resistant and hold up well against high temperatures, however, they are porous and easily absorb moisture which can lead to stains and bacteria. To avoid this, you’ll need to reseal your concrete countertops every 1 to 3 years depending on your specific counters and sealant. To keep your concrete counters protected and in good condition, use non-abrasive cleaners and cloth.
Unfortunately, concrete countertops have a high likelihood of cracking over time from things like appliances tightening, readjustments, and houses settling. These countertops are likely to shrink when temperatures change which can create hairline cracks. While the likelihood of cracks and shrinking happening are lower when you go with a professional, concrete can naturally shrink on its own. Thankfully, there are various ways to repair cracks in concrete countertops such as latex caulking, silicone caulking, and epoxies.
Concrete countertops are customizable and great for homeowners wanting a unique kitchen. There are different dyes available that give concrete countertops beautiful shades to match your home and create bursts of color. These counters are precast and installed in your home so you don’t have to wait a month for them to fully set.
Upfront Costs: $$$+
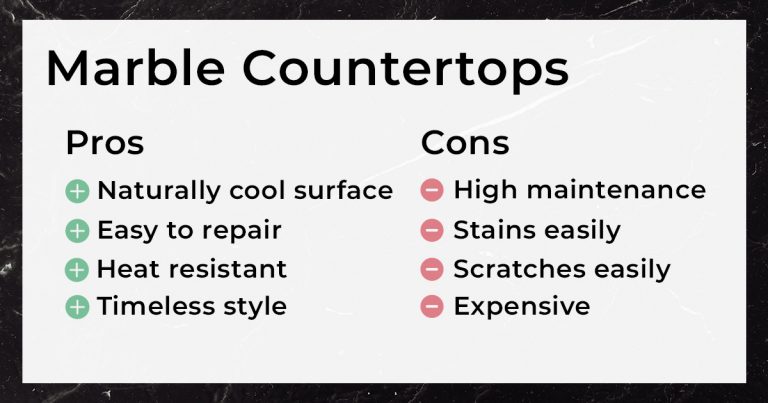
Marble countertops are beautifully unique but have a high price tag. These countertops are seen as timeless and sophisticated with various colors and one-of-a-kind patterns. Despite their popularity, marble counters aren’t a good fit for frequently used kitchens as they’re high maintenance and very susceptible to stains, scratches, etches, and chips. In fact, damage to marble counters is frequently caused by common acidic foods and drinks such as lemon juice, tomato, wine, vinegar, and coffee.

Homeowners who frequently work with dough, pasta, and chocolate will enjoy the marble countertops’ naturally cool temperature which is perfect for these foods. However, despite their natural coolness, you should never place a hot pan directly on your marble countertops as this can damage them.
Although they can be easily damaged, these counters aren’t too difficult to repair and clean. That being said, you’ll need to regularly reseal marble countertops every 6 months to 1 year to keep them protected. To remove shallow scratches and water stains, you can buff out your countertop with #0000 steel wool. When you clean your marble counters, you should use 12% hydrogen peroxide, a little ammonia, and a non-abrasive cloth. With routine maintenance, marble countertops will remain durable and beautiful for years to come.
Upfront Costs: $$$+
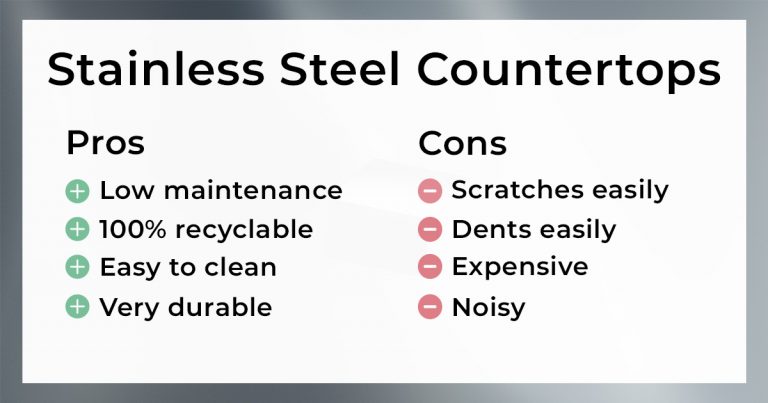
Stainless steel countertops aren’t just for restaurants, they also look great in residential homes with their clean, industrial appearance. As evidenced by their place in restaurant kitchens, stainless steel countertops are heavy-duty and perfect for kitchens that are frequently used. While these counters are generally more expensive than other countertop materials, they are much more durable and require less upkeep.

Resistant to heat and rust, stainless steel counters don’t need resealing and, unlike other countertop materials, aren’t harmed by liquids or acidic foods. However, it’s important to clean up spills on your stainless steel counters immediately as the longer it sits, the harder it can be to clean. Overall though, these counters are very easy to clean and aren’t damaged by strong cleaners.
One downside to stainless steel countertops is the material can be very noisy. They also need to be wiped down frequently to remove water spots and fingerprints, which show up easily on stainless steel. Like other countertops, you shouldn’t cut directly on your stainless steel counters. You need to always use a cutting board to keep your countertop in good condition and free from dents and scratches.
Picking high-quality stainless steel is important when choosing countertops of this material. The higher the quality, the less likely you are to dent or scratch your stainless steel counters. If choosing a clean, durable, and environmentally friendly countertop material is important to you, these 100% recyclable counters may be a perfect fit for your home.
When choosing the countertop material that best suits your lifestyle, home, and family, keep in mind what counter features are top priorities for you. By making a list of what you find most important in your kitchen, deciding on a countertop will be much easier. To get more tips and guidance on remodeling your home interior and exterior, check out E&E Contracting’s monthly blog. Have a renovation project or home addition in mind? Get started today by receiving your free quote and speaking with a building professional.
High-quality decks can last for decades if they are properly taken care of with yearly maintenance. Thorough maintenance should be completed at least once a year, ideally in the springtime before heavy use during the summer months. You’ll want the deck in good condition for your summer get-togethers! Here’s a list of tasks to complete during your yearly deck maintenance.

The first thing you’ll need to do with deck maintenance is clean it. Temporarily move all of your deck furniture to your garage or yard for temporary storage and start by sweeping all debris, like fallen leaves, off of your deck. Next you’ll want to wash your deck to clean and prevent mildew and other stains. Using a pressure washer will make this task easy but be careful with how strong you pressurize your machine. Pressure washing at high pressures will damage your deck more than help it. Keeping it around 500-600 psi is safe. If you don’t own a pressure washer, hand mopping and scrubbing is a good alternative.
Once the deck is clean, you’re better able to inspect the wood for any rot or other damage. Don’t just look at the decking surface; go underneath the deck to inspect the joists, beams, and posts. It’s also very important to inspect the ledger board for any water damage to your house foundation. Any rotten wood you find will need to be replaced. If you don’t encounter any rotten wood, you’ll want to stay underneath the deck and move on to the next step.
After inspecting all of your wooden deck components, it’s time to inspect the hardware. All of your fasteners, screws, and nails should be tight and secure to their anchor points. Tighten any loose hardware you encounter and replace it if it’s unable to be tightened or is rusting. Once you’re done underneath the deck, head back to the top to finish your inspection. If screws or nails are protruding from the floor, hammer or tighten them until they’re flush with the surface. Sometimes, you may need a new nail or screw. Finally, push against all hand railings to ensure they are tightly fastened to the deck

Finally, with any new wood installed and everything tightened, it’s time to sand and reseal your deck. Do not do this step the same day that you wash the deck or after rainfall. You should allow 48 hours for the wood to fully dry. Sanding your deck with 80-grit sandpaper keeps it smooth and free from splinters or fuzzy patches. You can use an electric sander but it’s not necessary. Be sure to sweep or vacuum all sawdust before sealing.
Deck sealant protects your wood from cracking, cupping, and warping. Wood finishes made for other purposes, like varnish or lacquer, are no good here. Use protective sealant designed for decks. Similarly, paint is not recommended; it has a tendency to peel and crack. You can use a stain and sealant mix to recolor your deck instead.
Composite decks are more durable and require less maintenance compared to wooden decks. This doesn’t mean you can skip out entirely on yearly maintenance. You’ll still need to sweep and wash your deck, the only difference being you’ll use a composite deck cleaning agent. You’ll still need to inspect any wooden elements for rot and check all of your fastenings. The real time saver with composite decks is that there’s no need for sanding and resealing.

Although the majority of deck maintenance occurs during the spring, you still need to upkeep your deck throughout the year to minimize your work and expenses in the spring. Regularly sweep your deck clean of debris, especially when leaves fall in autumn.
In the winter, it’s very important to keep your deck safe from snow and ice. Water can seep into your wood, freeze, and expand, causing cracks in your decking. You can lay a tarp across your deck to protect it from the snow. If you don’t have one, be sure to shovel immediately after a snowstorm. You can also use ice melt to prevent the buildup of ice on your deck; however, do not use a salt-based ice melt. Rock salt can scratch and damage your wooden decks. There are plenty of non-salt ice melt alternatives on the market for you to choose from.
Have you neglected your deck and it’s in disrepair? Or perhaps you’re just exploring the possibilities of deck ownership. Consider purchasing a new deck from E&E Contracting. Our expert staff are happy to answer any questions you may have about constructing a deck in your backyard. Contact us today for a free consultation.
An attic conversion is an excellent addition to your home, which easily gives you more living space without impacting your lawn space. Often, these remodels will be less expensive than a brand new addition, as there’s usually no need for framing and foundation work. You can even increase the square footage of liveable space in your home, increasing its value. Here are the steps you’ll take to build an attic conversion. If you partner with a remodeling contractor, they’ll help you every step of the way.
Before any construction begins, you’ll need to research the permitting requirements of your municipal zoning board. They may require a building permit depending on the scope of your conversion. If you are simply installing flooring and drywall, you might not need any permits. If you are installing utilities or making any structural changes, like adding dormers, then you will need permits. Check with your local government for your specific requirements.

First, floors must be secure enough to hold the weight of people & furniture on them. Many attics may not be originally built to support this weight, so additional joists and supports may be added. Depending on your local ordinances, you may also need to install a stairway if your attic is only accessible by ladder. Next, you may want to replace old, inefficient insulation with newer insulation. High-quality insulation, like spray-foam insulation, makes the space feel like a real room in your home, planned from the start.
Any utilities, like eclectic or HVAC, should be installed before finishing. From there, drywall and flooring can be installed. The drywall and a fresh coat of paint will make the room look finished. Your flooring choice can be whatever you want and can impact the functionality of the space. Carpeting is a nice soft flooring for a kid’s playroom. Hardwood is a nice, classic look for a study or office space.
When you want extra lighting or floor space in your attic, a good option is to build out a dormer. A dormer is a roofed structure that projects out from the pitch of the roof to allow more space and light in your attic. It has a vertical window and three walls, allowing you to fit taller items or more standing room in a slanted attic.
Dormers are built after the floor is reinforced but before any insulation and finish work is done. First, the layout will be marked on the floor and roof before the roof is opened. Roofs are opened by marking the shingles and sawing along them. Then, the rafters are reinforced and the walls’ frame is built. After the frame is built, the roof is extended over the dormer and the dormer’s rafters are installed. Lastly, the exterior and interior walls are finished.
Finished attics only count as square footage in your home when they satisfy certain requirements. Typically, you must have a ceiling height of at least 7 feet over at least 70 square feet of floor space. So, your attic may be hundreds of square feet but the slanted ceilings prevent you from counting the entire space. If you don’t meet the 70 sq ft minimum requirement, or would like to include more square footage in the total, then 7 ft dormers will give you that extra amount of space that counts towards the total. This area must also be properly climate controlled and have windows for natural lighting and emergency escape routes. Check with your local ordinances to understand what you can and cannot count as liveable space.
If you’re not as skilled with tools or don’t have the time to renovate your attic on your own, then trust an experienced contractor to do the job right. E&E Contractors uses exceptional materials and quality workmanship to deliver the best results possible for your renovation. Contact us today to start planning your attic conversion.
As spring quickly approaches and winter comes to a close many homeowners are looking to spruce up the exterior of their homes to make way for outdoor parties and get-togethers. During winter months a home’s exterior can fall to the wayside as homeowners stay inside to avoid the elements. Spring is the perfect time to update your home just in time for summer parties and get-togethers and to transform your home into something you can be proud of. Let’s take a look at some great ways to boost your home’s curb appeal, from minor updates to major renovations.
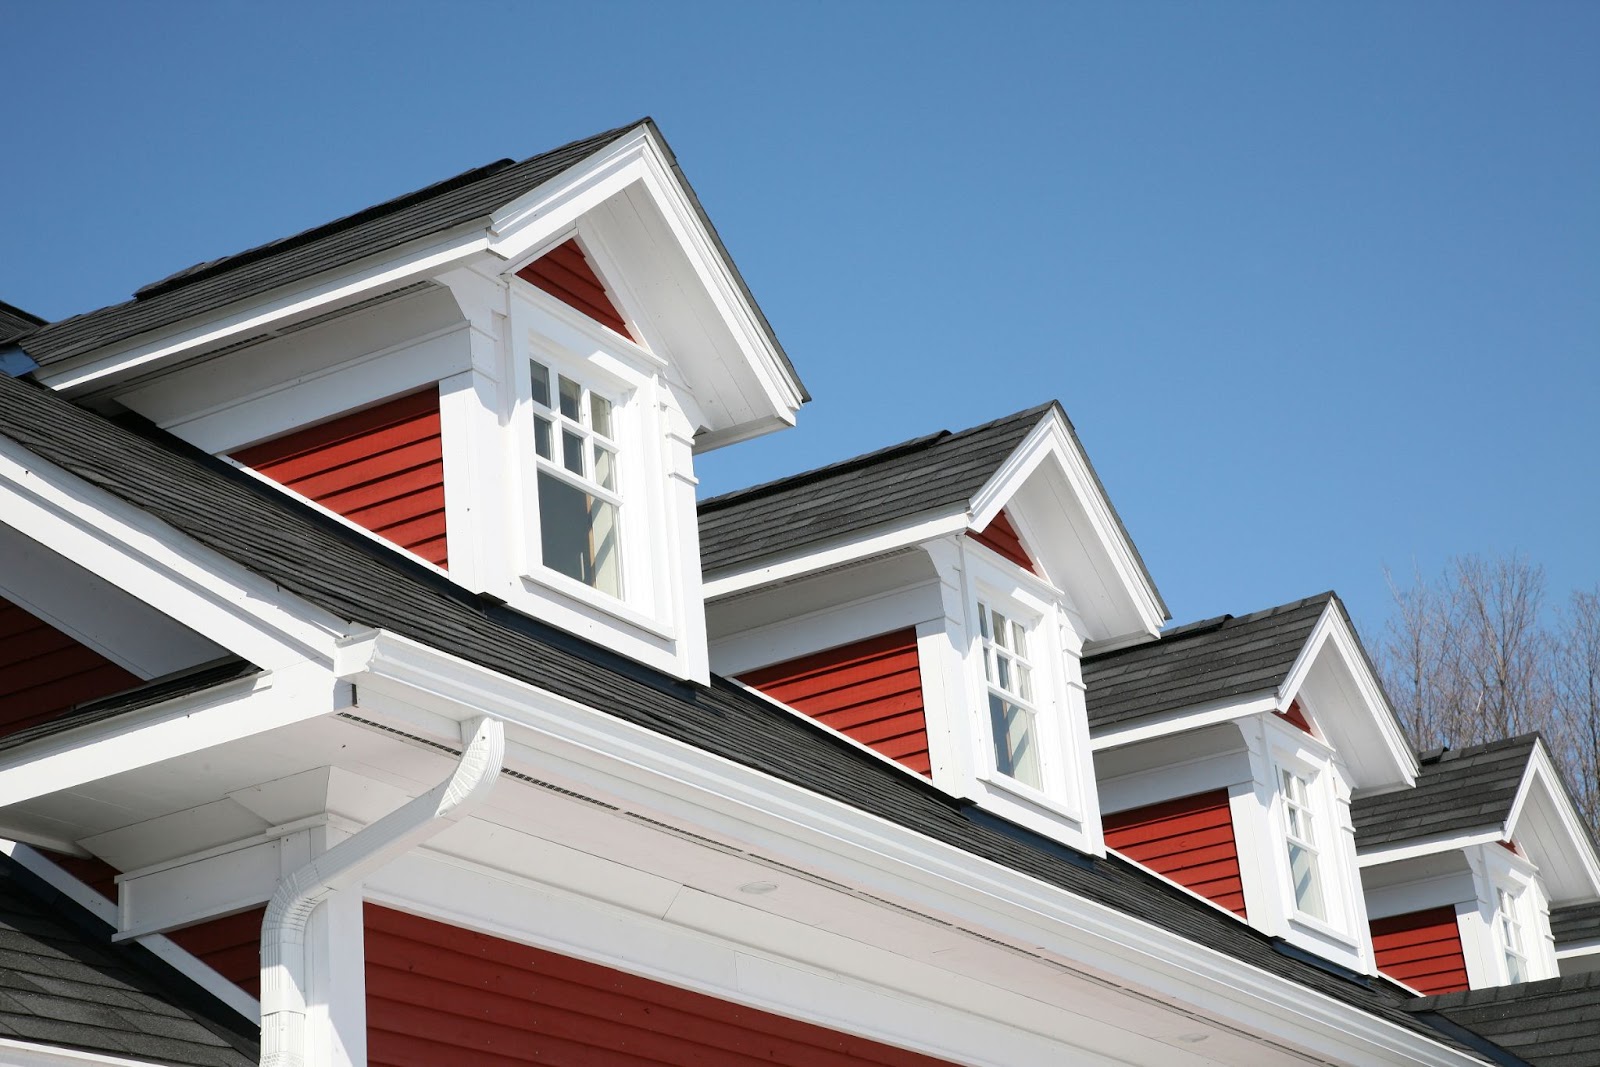
One easy way to boost your home’s curb appeal is to add shutters to your windows or upgrade your existing shutters. Shutters will add character to your windows and have the ability to transform a house into a home. There are a wide variety of shutter styles to choose from that can perfectly accent the siding and style of your home, and allow you to add your own flair to your home’s exterior.
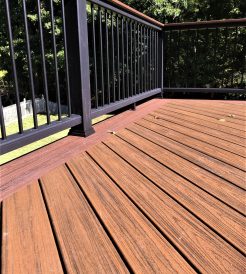
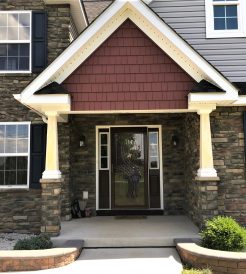
Another great way to add curb appeal to your home is by updating your front porch or deck. Your porch or deck is constantly exposed to the elements, and many homeowners will notice damage during spring inspections of their homes. The front porch is also the first impression your visitors will have of your home and updating it can bring new life to your home’s exterior.
If you’re looking for a quick facelift, we recommend updating your porch with new outdoor furniture, an area rug, and some plants or hanging baskets. Here are some great design ideas to get you started.
If you are looking for a porch or deck replacement, you’ve come to the right place! At E&E our team of experts would love to speak with you about your dream porch, and how to bring it to fruition in a way that fits your budget.
Replacing your home’s siding is an investment, but is a great way to bring new life to your home’s exterior and increase its value. Unless you built your home, you probably didn’t have the opportunity to choose your siding’s color or material. At E&E, we are siding experts and love working with our customers to choose materials that fit their styles and durability needs. When people look at your house one of the first things they will notice is your siding; shouldn’t the siding of your home match your style and taste?
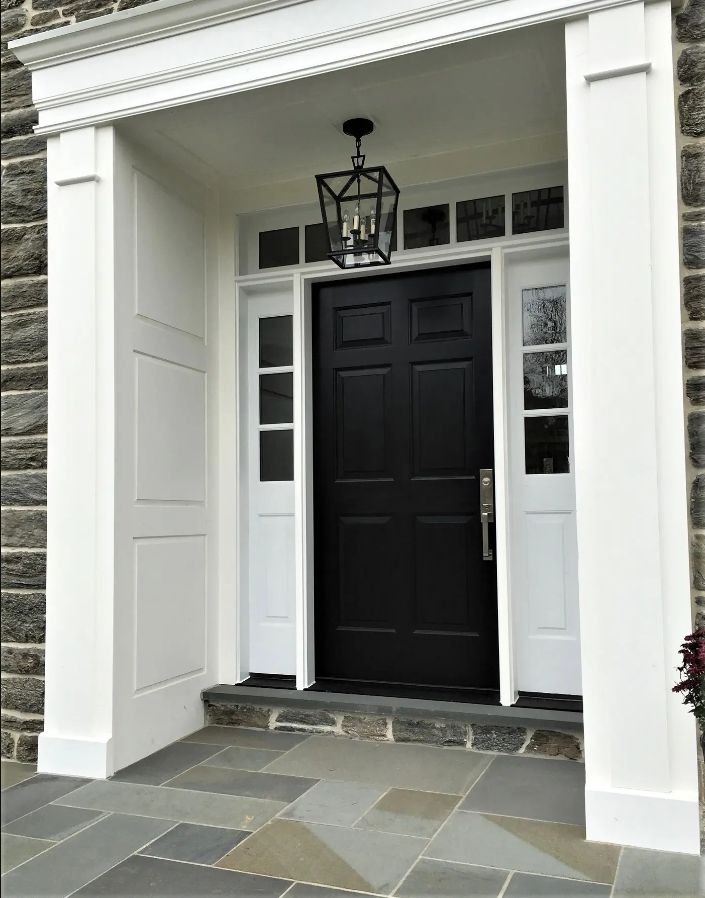
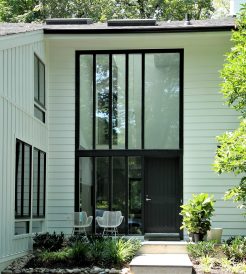
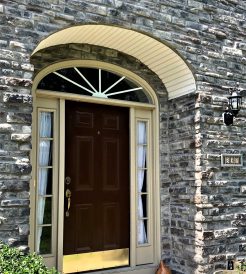
Another easy way to give your home an update this spring is to paint, refinish, or replace your front door. Our customers are always shocked at how much a little splash of color on the front door can transform a home, here are some color ideas to get you started.
If you have different ideas for your entryway, it might be time for a front door replacement. We love getting creative with entryways and working with our customers to create something beautiful. Our entryways don’t have to stop at the front door; updated trim, transom windows, and light fixtures welcome visitors to your home and offer an attractive finish.
A full exterior remodel is a big step but is the best way to boost your curb appeal and transform your house into the home of your dreams. Our team works with our customers during each step of the process to choose siding, window, door, shutter, and roofing options to fully realize their homes’ potential. If you are considering an exterior remodel, we would love to speak with you. Contact us today for a complimentary quote!
If you are looking for some more practical ways to boost your curb appeal, check out our spring maintenance tips. If you have any questions or would like to discuss your options we would love to speak with you, contact us for more information.
Looking to remodel your Pennsylvania basement but not sure where to start? First, you’ll need to do some generic finishing work that every basement needs. Then, you’ll decide the type of room you’ll create in your newly finished basement. Here’s our guide to help you through both processes.
As mentioned above, you need to finish your basement before remodeling it into a new room. The cost of finishing your basement varies depending on size, dividing walls, and any HVAC, plumbing, or electrical work needed for your intended use. It could cost anywhere from $50,000 to $150,000.
Without proper waterproofing or insulation, basements would allow moisture from the ground to seep through and heat to escape through the concrete. Pennsylvania can become very cold during the winter, so insulation is essential to keep your basement warm and liveable. Once the ground thaws in March, you’ll need to ensure your basement is waterproof to survive the wet seasons and discourage mold or mildew. Foundation repairs and leak sealing may be necessary to waterproof your basement.
After your basement is waterproofed and insulated, you’ll need to frame the walls for drywall and the ceiling for a conventional or drop ceiling. Not only will you frame your exterior walls but also your dividing walls if you plan on separating your basement into multiple rooms. You’ll also need to decide between a conventional ceiling, which looks nicer, and a drop ceiling, which is less expensive. Finally, you should cover up that concrete flooring with interior flooring. Be it tiles, hardwood, or carpeting, finishing your floors will make your basement truly livable.
Throughout the whole process, make sure you are following Pennsylvania’s building code. In order to count your finished basement among the square footage of your home, you need a point of egress at least 20 inches wide and 24 inches tall. This can be a window or exterior door. Your municipality might have additional requirements to abide by as well, so check with your local zoning officer. Finally, if you are doing any electrical, HVAC, or plumbing work, you’ll likely need a building permit. Again, check with your local zoning officer.
Once your basement is finished, you need to decide what to do with your new liveable space. Most people will turn their finished basement into a generic living room, perhaps with an additional bathroom if their budget allows for it. What if you’re looking for something a little more unique? Here are 6 trendy ideas to make your basement remodel a little more unique.

If you enjoy hosting parties or would like to cook some game-day snacks without heading upstairs, then a bar or kitchenette would be perfect for your basement remodel. Install a countertop, bar seating, a mini fridge or wine fridge, some cabinetry, and a sink and you’re ready to host some memorable parties. The plumbing for your sink might be a bit pricey but if you’re already planning on installing a bathroom, it may be less expensive.

Why pay for expensive gym memberships when you can workout at home? Free up some space in your garage by moving your home gym equipment to your newly finished basement. Install some mirrors or a TV on your gym walls and some foam floor tiles for safety.
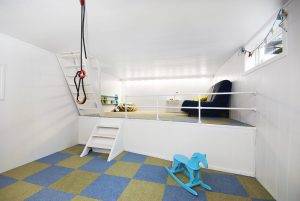
Creating a kids’ playroom in your basement is a great way to free up space in your home and give your children a safe place to be rambunctious kids. You can install padded carpet squares or foam floor tiles to keep them safe while running around. A small indoor slide or jungle gym will make your basement an amazing playroom. Of course, you’ll want a toy chest to keep all of their toys organized as well.

Another space-saving solution with your finished basement is to move your laundry room downstairs. You can section off a dedicated laundry room with dividing walls and install cabinetry along with the plumbing needed for your washing machine. You can store your cleaning supplies, as well as linens that you don’t use as often.

The most expensive renovation you can make to your basement is turning it into an apartment or in-law suite. Although expensive, you can turn this space into an extra source of income by renting it out to a permanent resident or on a home-sharing app, like Airbnb. If you frequently host friends and family overnight, this can also be a good way to give them a little space of their own. You’ll need to install a full bathroom, kitchen, or kitchenette, and have enough space for a bedroom. It’s also a good idea to have a full-sized door, rather than the minimally required egress so that renters don’t have to walk through your house to the apartment.

Another expensive renovation to your basement would be a home theater. Creating a home theater in a basement is perfect for cinema aficionados to get the movie theater experience without leaving their home. You’ll need a movie screen and projector installed on your wall, quality surround sound speakers, and comfortable, theater-like seating to relax in. Mood lighting can also set the tone for your home theater. Lastly, you’ll want to consider a bar or kitchenette for easy access to movie snacks.
Ready to start your own basement remodeling project? Contact the experienced renovation professionals at E&E Contracting today! We’ll help bring your vision to life, no matter how unique.